IP Phone Yealink dan Escene Dengan Fitur Auto Provision
68 , ==> 1
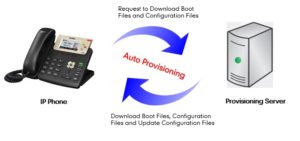
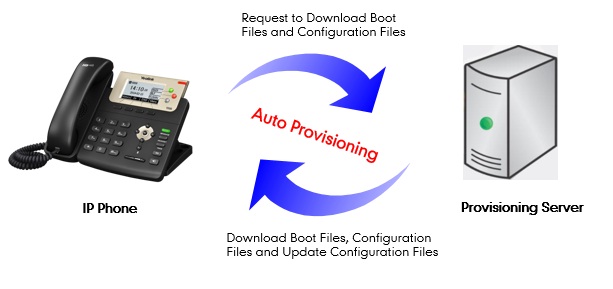
IP Phone Yealink dan Escene mempunyai fitur Auto Provision, agar IP Phone langsung dapat ter-register ke IP PBX tanpa harus setting IP Phone Yealink dan Escene satu per satu.
 IP Phone Yealink dan Escene : Cara Setting Auto Provision
Berikut ini adalah cara setting Auto Provision untuk IP Phone Escene. Auto Provision berfungsi untuk register massal IP Phone ke IP PABX. Biasanya kita memerlukan Auto Provision di saat ada banyak IP Phone yang harus diregister ke IP PABX, misalnya IP Phone dengan Extension nomor 100 sampai 300.
Kalau kita register satu per satu IP Phone Yealink tersebut ke IP PABX, akan menggunakan waktu yang sangat lama. Dengan Auto Provision, waktu register ini dapat dipersingkat.
Pre-configuration on TFTP/HTTP/HTTPS/FTP Server
When the software or kernel auto-provision is enabled and want to run, IP Phone will check the software and kernel version at first, so we need make some pre-configuration on the provisioning server.
Auto Provision for Software:
1. Create a notepad file named“F000XXX.cfg” or “FD000XXX.cfg” (the “XXX” is decided by the model of the IP phone you are using, for example, if the model is ES620, the file name is “F000600.cfg”,the “FD” is decided by the model of the IP phone with ‘N’, for example,ES320N); *Named rule of the file: F000600.cfg: for ES620, ES610 and DS622; F0WS600.cfg: for WS620 F000400.cfg: for ES410 and DS412; F000300.cfg: for ES310 and DS312; F000200.cfg: for ES210 and DS212. F000320.cfg: for ES320 F0WS320.cfg: for WS320 F000330.cfg: for ES330 F000118.cfg: for HS118 F000108.cfg: for HS108. FD000320.cfg: for ES320N and WS320N FD000330.cfg: for ES330N FD000220.cfg: for ES220N and WS220N FD000100.cfg: for US101N and US102N and US103N and WS102N FD000108.cfg: for HS108PZ FD000110.cfg: for IP115 FD000120.cfg: for IP125 FD000400.cfg: for ES410N FD000600.cfg: for ES620N 2. Open the notepad file “F000XXX.cfg” or “FD000XXX.cfg” and write the new software name in it, the software file name format must like this:S(2)_Phone Model_version+Version Number. the “S2_” decided by the model of the IP phone with ‘N’,for example, ES620: the software name is like “S_ES620_version2.2.7.5-3077” ES320N: the software name is like “S2_ES320N_version1.1.5.0-1147” Other Model and so on. Write down the new version you want to upgrade and save it on your provisioning server. *Please note that if the version is not older than (and same as) the one on your phone, auto-provision of your software would be not available. 3. After it, upload the new software to the TFTP/HTTP/HTTPS/FTP provisioning server and complete the pre-configuration steps. Auto Provision for Kernel: 1. Create a notepad file named“K000XXX.cfg” or “KD000XXX.cfg”(the “XXX” is decided by the model of the IP phone you are using, for example, if the model is ES620, the file name is “K000600.cfg”, the “KD” is decided by the model of the IP phone with ‘N’, for example,ES320N); *Named rule of the file: K000600.cfg: for ES620, ES610 and DS622 and WS620; K000400.cfg: for ES410 and DS412; K000300.cfg: for ES310 and DS312 and ES320 and HS118 and WS320; K000200.cfg: for ES210 and DS212 and HS108; K000330.cfg: for ES330; K000100.cfg: for US101 and US102 and US103. KD000320.cfg: for ES320N and WS320N KD000330.cfg: for ES330N KD000220.cfg: for ES220N and WS220N KD000100.cfg: for US101N and US102N and US103N and WS102N KD000108.cfg: for HS108PZ KD000110.cfg: for IP115 KD000120.cfg: for IP125 KD000400.cfg: for ES410N KD000600.cfg: for ES620N 2. Open the notepad file “K000X00.cfg” or “KD000XXX.cfg” and write the new kernel name in it, for example, K_uImage_200_version2.2.9.bin: for ES210 and DS212 andHS108; K_uImage_300_version2.2.9.bin: for ES310 and DS312 and ES320 and HS118 and WS320 and ES320 and ES330; K_uImage_400_version2.2.9.bin: or ES410 and DS412; K_uImage_600_version2.2.9.bin: for ES620, ES610 and DS622 and WS620; K2_uImage_100N_version2.6.3.bin: all the model of the IP phone with ‘N’, ES320N and ES220N and ES330N and so on Write the new version you want to upgrade and save it on your provisioning server. *Please note that if the version is not older than (and same as) the one on your phone, auto-provision of your kernel would be not available. 3. After it, upload the new kernel to the TFTP/HTTP/HTTPS/FTP provisioning server and complete the pre-configuration steps. Configuration files on TFTP/HTTP/HTTPS/FTP Server Name of configuration file: The configuration file on the provisioning server is named as the MAC address of IP phone itself. Escene’s IP phones support two different configuration files for auto-provision: 1. Normal Configuration file: Normal Configuration file is the configuration file of your Escene IP phone. You can download it from your phone (You can see the following chapter to see how to download a configuration file from Escene IP hone) and modify by yourself. If the phone model with ‘N’,for example ES320N,please see this: The Normal Configuration file can separate two part: Global parameters configuration file:for example Audio Codecs、Volume、Server URL and so on,make these global parameters to a file,and can use by different model(model name come form web or LCD menu),the filename format must be sys_model.xml ES320N: sys_ES320N.xml ES220N: sys_ES220N.xml Reference XML documents: Private parameters configuration file:for example Account configuration that different phone,the filename format must be MAC.xml,for example 00112233445.xml。 Reference XML documents: If the phone model don’t with ‘N’, or example ES620,please see this: If the IP phone’s MAC address is 00:11:22:33:44:55, the normal configuration file of it should be 001122334455.xml. Reference XML documents : 2. Broadsoft Configuration files: Broadsoft Configuration files support the format of Broadsoft IP-PBX. However, you can use them for provisioning. There are two files should be set on your provisioning server, they are also named by the MAC address of your phone 1) 001122334455.cfg: a configuration file for system settings, for example, network, audio and so on. 2) 001122334455.txt: a configuration file for SIP accounts. 3.How to create the Configuration file Download a configuration file from your phone: You can download a configuration file from your phone by HTTP as follow: 1. Open the web page of your IP phone, click “Phone Maintenance”>“HTTP Upgrade”; 2. Then click “Download” of Configuration: 3. If you want to use this file to auto-provision, you just need to modify it by yourself and rename it to the MAC address of your IP Phone with .xml suffix. create the Configuration file Manually If you want to create the Configuration file Manually,you must read this reference documents about the Configuration file format detail and you may know the what mean parameters of the Configuration file: Configuration file format detai Extern.xml file on TFTP/HTTP/HTTPS/FTP Server The Extern.xml includes the settings of programmable buttons on the phone and all Expansion Modules. All the phones can download the settings from a same file and they will have the same settings (for example, Speed-dial, BLF and so on). *You can’t rename the file on the provisioning server. The file name is fixed to Account1_Extern.xml.(Account1 is the first account you register) Reference XML documents : Phonebook on TFTP/HTTP/HTTPS/FTP Server Escene IP phone supports Enterprise Phonebook and Personal Phonebook.They use same XML format,you can see the reference documents. Enterprise Phonebook: Enterprise Phonebook is used for all staffs in your office. All phones will download a common phonebook for all staffs. The file’s name must be Enterprise_Phonebook.xml on your provisioning server and you can not rename it. Personal Phonebook: Personal Phonebook is individual for each IP phone. The file on your provisioning server is named by the first account of your IP phone. If the IP phone’s first account is 1287, the Personal Phonebook of this phone is 1287_Phonebook.xml. Reference XML documents: Automatic Provisioning using DHCP Option 66 The following steps will descript auto-provision by TFTP. You also can use HTTP and FTP for auto-provision with our phones. DHCP Server: (Microsoft Windows 2003 server) 1. Start up the “DHCP Management Console”; 2. Expand the DHCP scope which will contain the phones 3. Right-click on the “Scope Options” node 4. Select “Configure Options” 5. In the “General” tab, scroll down the list of options and identify the option labeled “066 Boot Server Host Name” 6. Enable the “066 Boot Server Host Name” and enter the string value according to the examples discussed previously string value: 192.168.0.201(TFTP Server IP Address); 7. Click the “OK” button IP Phone: 1. Input the IP Phone’s IP Address in browser; 2. Enter user and password with “root” then open the web page; 3. Click “Phone Maintenance” and select “Auto Provision”; 4. Select like as follows: 5. Click “Submit” to save it. Auto-Provision via fixable TFTP/HTTP/HTTPS/FTP Server IP Phone: 1. Input the IP Phone Yealink and Escene IP Address in browser; 2. Enter user and password with “root” then open the web page; 3. Click “Phone Maintenance” and select “Auto Provision”; 4. select like as follows: It supports three protocols in Auto-Provision:TFTP,HTTP and FTP. The format with provisioning server URL is: TFTP: TFTP://192.168.0.201(192.168.0.201 is the default Server IP address) HTTP: HTTP://192.168.0.201 HTTPS://192.168.0.201 FTP: FTP://192.168.0.201 Username: the user to login FTP/HTTP/HTTPS server Password: the password of the user using to login FTP/HTTP/HTTPS server *Username and password are available in FTP/HTTP/HTTPS only (unavailable in TFTP). Auto Download Software: Download software from server and upgrade it automatically. Auto Download Kernel: Download kernel from server and upgrade it automatically. Auto Download Config File: Download configuration file from server and update it automatically. BroadsoftCompatibility: If you select this function, you need to put two configuration files (with Broadsoft format) on the provisioning server. Otherwise, you can download the configuration file from your phone via HTTP (regarding the steps, you can refer to “Download a configuration file from your phone” in this document.), modify it and upload it to the server for auto-provision. Auto Download Expansion: Download configuration file of the Programmable buttons on your phone or Expansion Modules automatically. Auto Download Enterprise Phonebook: Download Enterprise Phonebook from server and update it automatically. Auto Download Personal Phonebook: Download Personal Phonebook from server and update it automatically. Booting Checked: Check all items you had selected and upgrade/update them when the phone boot Auto Provision Frequency: The auto provision Frequency which you want. Auto Provision Time: The time you want to execute auto-provision. Examples of Auto Provision Frequency and Time 1) When you set the Auto Provision Frequency and disableAuto Provision Time (set to None), the Auto Provision function will work after the AutoProvision Frequency; 2) When you set both Auto Provision Frequency and Auto Provision Time, for example: You set the AutoProvision Frequency to 24 hours, and the Auto Provision Time to 2:00 at 8:00 today (1, Jan), it will pass 24 hours at first and work at the nearest 2:00, it means that the Auto Provision function will work at 2:00 on the day after tomorrow (3, Jan). Therefore, if you want this function work at 23:00 tonight and it is 8:00 now, you need to set the Auto Provision Frequency to 0 hours and the Auto Provision Time to 23:00. AES Encryption: AES encryption is used for all the setting files of your phone (include configuration file, Expansion file, Enterprise/Personal Phonebook etc. You just need to enable the AES Encryption function and input the AES Key matching the one on your server on.IP Phone Yealink Auto Provision Step
This section provides instructions on how to get ready for auto provisioning. To begin the auto provisioning, the following steps are required: Obtaining Boot, Configuration and Resource Files Obtaining Phone Information Obtaining Boot, Configuration and Resource Files Boot Files The IP phone tries to download the boot file first, and then download the configuration files referenced in the boot file during auto provisioning. You can select whether to use the boot file or not according to your deployment scenario. If required, you need to obtain the template boot file named as “y000000000000.boot” before auto provisioning. You can use a boot file to specify which configuration files to be downloaded for specific phone groups by phone model identity, and customize the download sequence of configuration files. It is efficient for you to provision IP phones in different deployment scenarios, including all IP phones, specific phone groups, or a single phone. The configuration files referenced in the boot file are flexible: you can rearrange the configuration parameters within the Yealink-supplied template configuration files or create your own configuration files from configuration parameters you want. You can create and name as many configuration files as you want and your own configuration files can contain any combination of configuration parameters.Configuration Files
Before provisioning, you also need to obtain template configuration files. There are two configuration files both of which are CFG-formatted. We call these two files Common CFG file and MAC-Oriented CFG file. The configuration files contain parameters that affect the features of the phone. You can use the configuration files to deploy and maintain a mass of Yealink IP phones automatically. You can create and name as many configuration files as you want (e.g., account.cfg, sip.cfg, features.cfg) by using the template configuration files. The custom configuration files can contain the configuration parameters of the same feature modules for all phones.Obtaining Template Files
You can ask the distributor or Yealink FAE for template files. You can also obtain them online: http://support.yealink.com/documentFront/forwardToDocumentFrontDisplayPage. To download template boot, configuration and resource files: Getting Started 1. Go to Yealink Document Download page and select the desired phone model. 2. Download and extract the combined template files to your local system. For example, the following illustration shows the template files available for SIP-T23G IP phones running firmware version 82. Untuk lebih detail download panduan di link ini : https://support.yealink.com/forward2download?path=ZIjHOJbWuW/DFrGTLnGypuWyg0RhC93g6wAfH48bnLZ9/KztkU3gd/plusSymbolcQXr1JNS6mgGrzsIgcv8GwffXbLcEvKQWbjBozmXZHtx8tp5M1U3mWVCCnXPEpJjglR6325eSR/lUFeYLw4/UCdj13ArbtXBLjG6UX3B0 Untuk Konsultasi Teknikal & Pembelian alat : PT SOPHOS TECHNOLOGY. Kompleks Perkantoran Grand Olimo Jl. Hayam Wuruk Raya kav.102-C0, Jakarta Barat Telepon 021-2262-4988Tags: IP Phone dengan fitur Auto Provision